Как сделать прокси в adobe premiere
Работа с прокси в Adobe Premiere
Прокси (Proxy) — видеофайлы с низким разрешением, используемые при монтаже, вместо оригинальных файлов. Работа с такими файлами снимает нагрузку на систему, сохраняет быстродействие работы монтажной программы. Актуально при работе с тяжеловесными RAW-форматами, а также если не хватает мощности компьютера.
Настроим автоматическое создание прокси при импорте файлов:
1. File — Project Settings — Ingest Settings
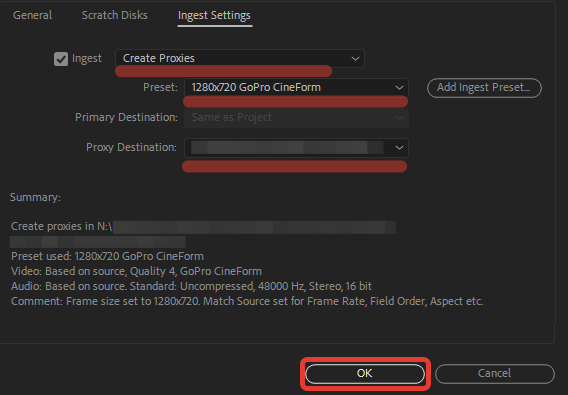
2. Во вкладке Ingest Settings выбираем Create Proxies. Самым оптимальным кодеком будет 1280×720 GoPro CineForm. По умолчанию Premiere создает прокси в папке рядом с исходником, лучше назначить для этого отдельную папку в поле Proxy Destination. Сохраняем настройки, нажав OK.
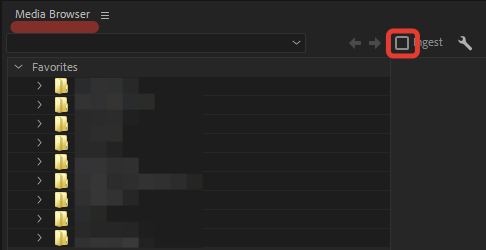
3. Включить/выключить функцию Ingest можно в окне Media Browser.
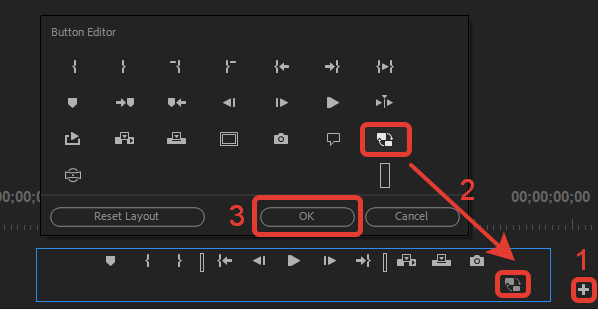
4. Функция Toggle Proxies переключает прокси на исходник и обратно. По умолчанию эта кнопка скрыта. В окне Source нажимаем [+] и переносим кнопку Toggle Proxies на панель управления, зажав ЛКМ (левую кнопку мыши). Сохраняем нажатием кнопки ОК.
При экспорте прокси автоматически заменятся на оригинальные файлы.
Работа с прокси в Adobe Premiere Pro
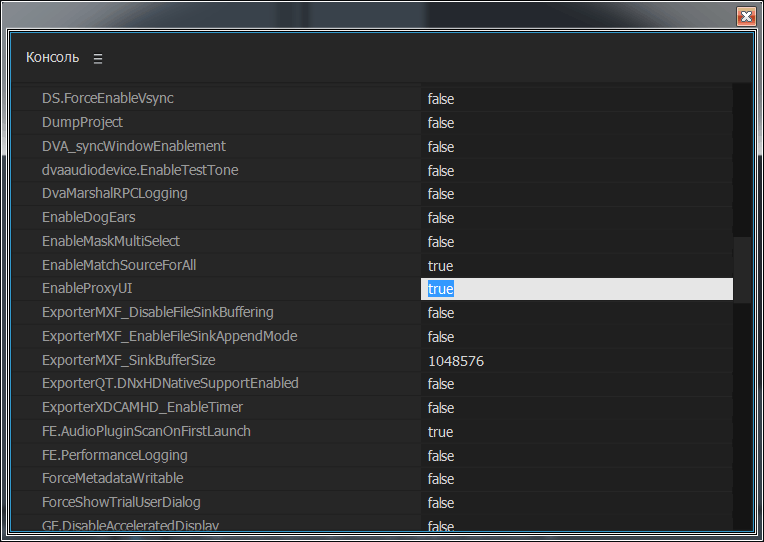
Еще не вышла версия программы Adobe Premiere Pro CC 2015.3, а с некоторыми ее функциями уже можно ознакомиться. Запускаем программу Adobe Premiere Pro CC 2015.2 и идем в Консоль, и для параметра EnableProxyUI вбиваем значение true.
Перезагружаем программу. Импортируем видео в проект (Ctrl+I).
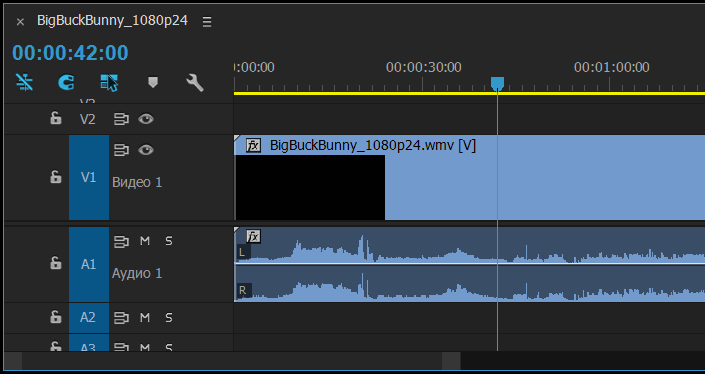
Создаем на его базе эпизод/последовательность/Sequence, выбрав его и выполнив команду: Файл > Создать > Создать эпизод на основе клипа / File > New > Sequence From Clip.
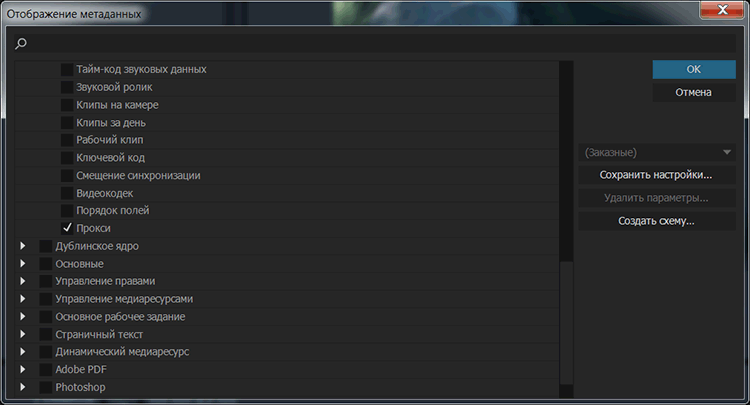
В окне проекта выбираем из выпадающего списка: Отображение метаданных / Metadata Display.
Далее, в окне Отображение метаданных открываем закладку: Метаданные проекта Premiere Pro / Premiere Pro Project Metadata. И ставим галку перед пунктом: Прокси / Proxy. Нажимаем на кнопку: ОК.
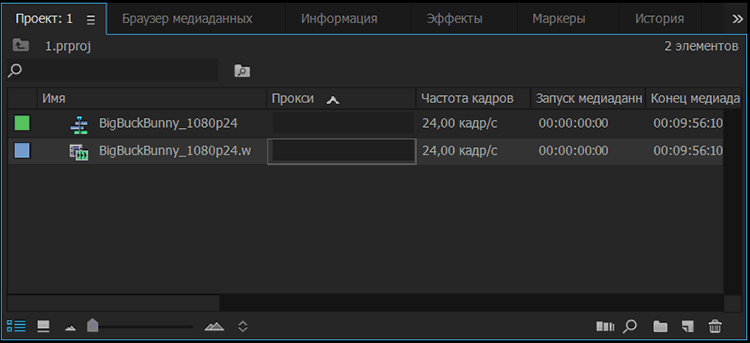
Переключаемся на отображение в окне проекта в виде списка (Ctrl+Page Up).
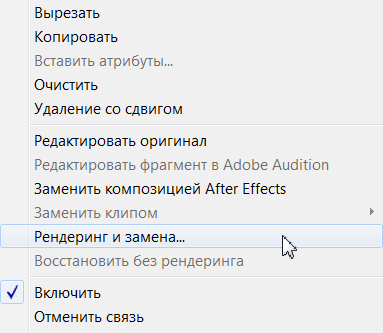
Теперь нажимаем на правую кнопку мыши на выделенном клипе на таймлайне и выбираем пункт: Рендеринг и замена / Render and Replace.
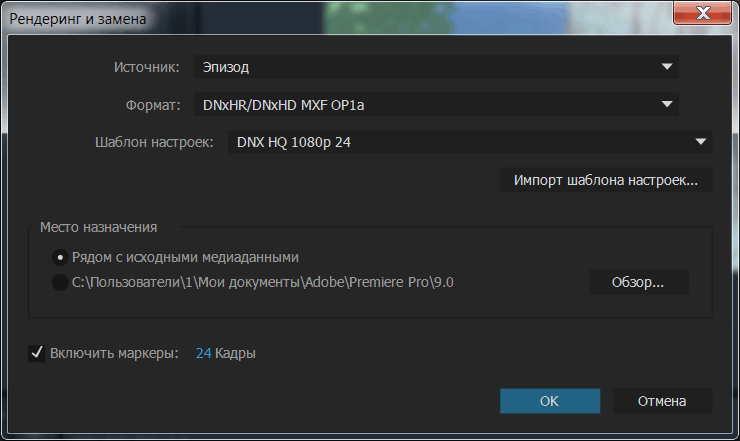
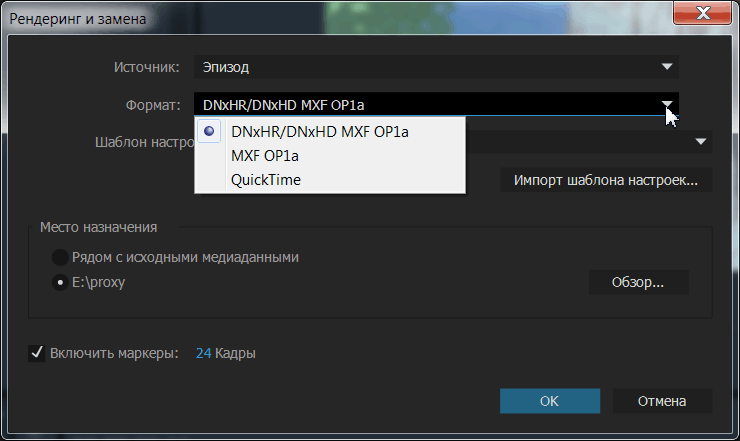
Появится окно: Рендеринг и замена / Render and Replace, идем в раздел Место назначения / Destination.
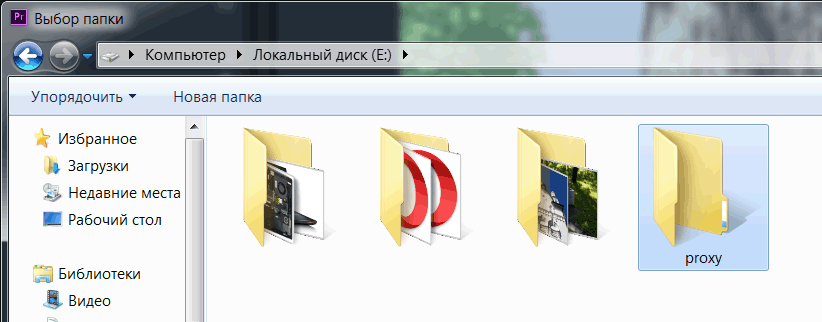
Изменяем место назначения, нажав на кнопку: Обзор. Выбираем папку для прокси файлов и нажимаем на кнопку: Выбор папки.
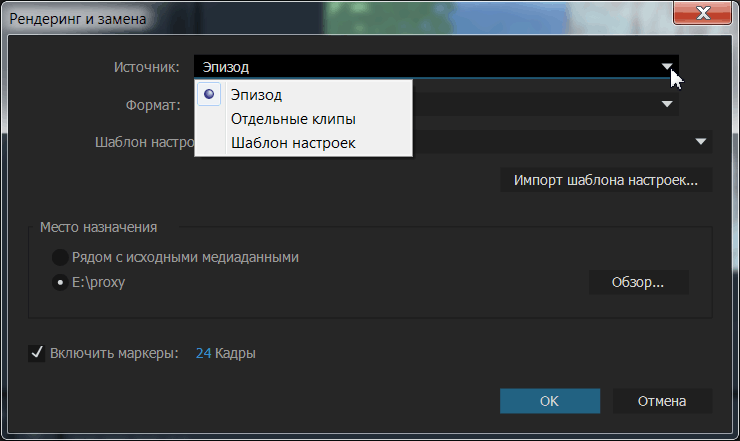
Далее, в выпадающем списке Источник: / Source: выбираем — Эпизод / Sequence, Отдельные клипы / Individual Clips (можно создавать прокси для нескольких выделенных клипов) или Шаблон настроек / Preset.
Формат: / Format: доступны три пункта: DNxHR/DNxHD MXF OP1a, MXF OP1a, QuickTime.
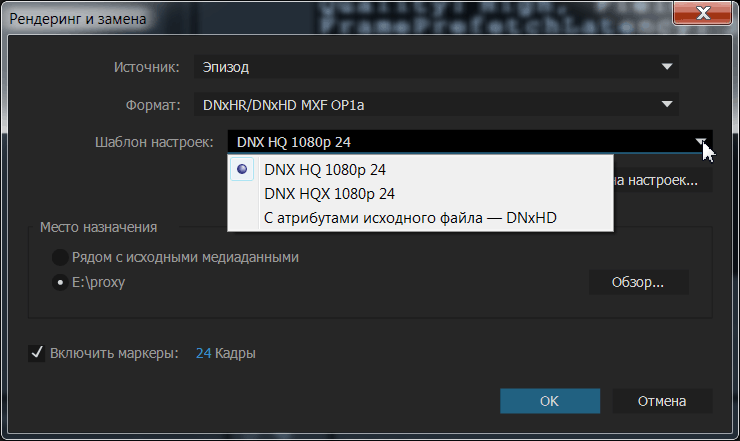
Далее выбираем из списка или импортируем Шаблон настроек: / Preset:
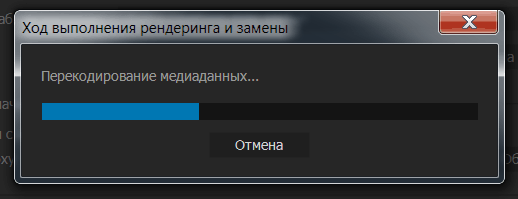
Нажимаем на кнопку: ОК. И запустится рендеринг выбранных файлов. В окне: Ход выполнения рендеринга и замены, следим за индикатором статуса — Перекодирование медиаданных.
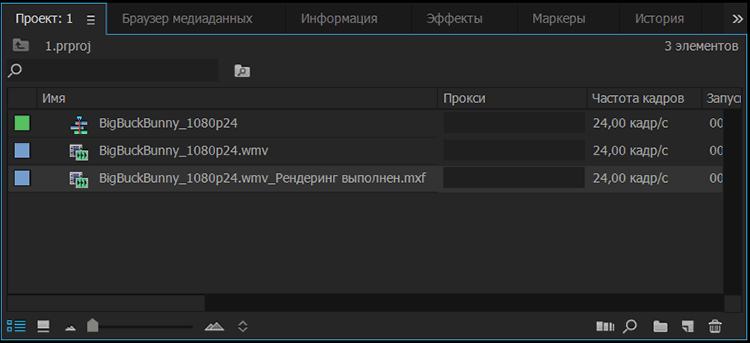
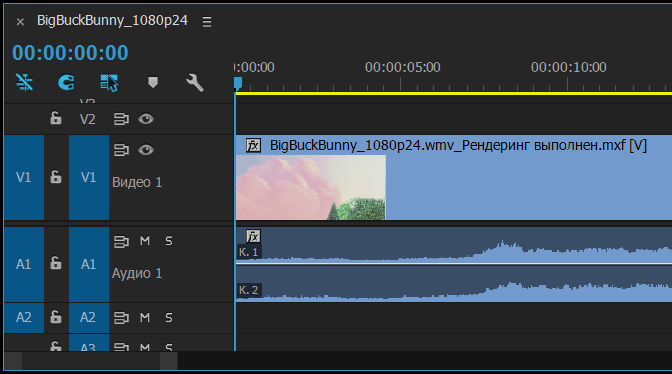
По окончании просчета, получаем следующий файл в окне проекта: с окончанием _Рендеринг выполнен.
На таймлайне, файл будет автоматически подменен:
А также запустится процесс согласования аудио:
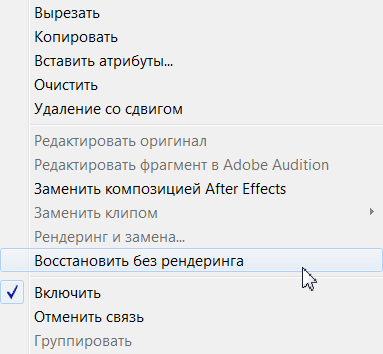
Нажимаем правую кнопку мыши и выбираем: Восстановить без рендеринга / Restore Unrendered.
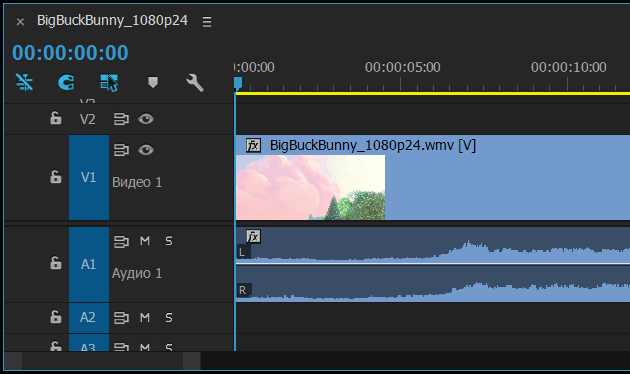
Оригинальный файл, будет восстановлен на таймлайне. А также прокси файл будет удален из списка в панели Проекта.
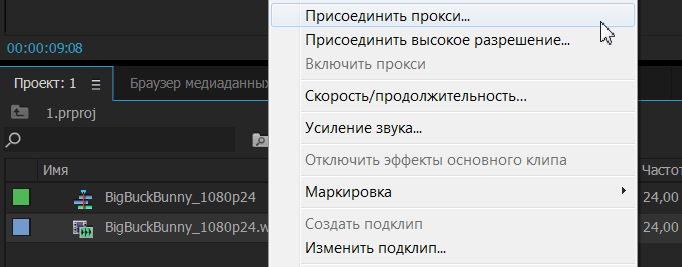
Идем в панель Проект / Project, выбираем файл, нажимаем правую кнопку мыши на нем, и из списка выбираем: Присоединить прокси. (также доступны новые команды: Присоединить прокси / Attach Proxy, Присоединить высокое разрешение / Attach Hi-Res, Включить прокси / Enable Proxies).
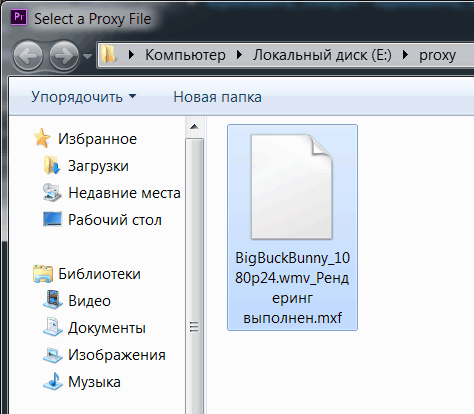
Выбираем в окне Select a Proxy File, ранее созданный прокси файл и нажимаем на кнопку: Открыть.
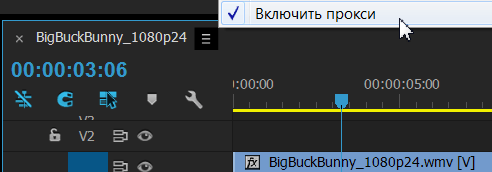
Для переключения между оригиналом и прокси, используем следующий пункт: Включить прокси / Enable Proxies. Если поставить галку, то будет воспроизводиться прокси, если снять, то оригинальное видео.
При снятии галки, имя файла не меняется, то можно запутаться какое видео играет в данный момент прокси или нет. На помощь придет информация о используемом декодере. Нажимаем комбинацию клавиш: Ctrl+Shift+F11 и смотрим на пункт PF:
Также можно заменить выбранный файл на любой другой, например выделяем файл в окне проекта, нажимаем правую кнопку мыши на клипе на таймлайне и выбираем: Заменить клипом > Из подборки / Replace With Clip > From Bin.
Конечно это не весь функционал, например недоступна закладка: File > Project Settings > Ingest Settings, это центральная закладка по кодированию, копированию и работе с прокси. Но уже и с выше перечисленными инструментами можно комфортно работать с прокси. Также нет кнопки в меню: Редактор кнопок, которая отвечает за быстрое переключение: оригинал/прокси.
Work offline using proxy media
Adobe Premiere Pro allows you to work with a wide range of formats and codecs natively, including ultra high definition resolutions.
These media files can be very large and require particularly fast storage to play back. At the same, time editors want to work on lighter weight devices, which tend to have less processing power.
Premiere Pro allows you to switch easily between your original high-resolution media and proxy low-resolution files. And let’s take a look at how this works.
In the media browser, I have some 5k RAW media, which is difficult for my current system to play back. You’ll notice at the top of the media browser, I have this Ingest option that I can enable or disable. I’m just going to turn that option on. And right next to that I’ve got a Settings button. I’m going to click on this button and bring up our Ingest Settings for our project.
Before I go any further, you’ll notice that this Ingest Settings tab is actually grouped with the rest of our Project Settings. In fact, you can get access to these as well by going to the File menu, going into Project Settings and well, you can see them on the list right here.
With these options enabled, Adobe Media Encoder performs additional services in the background while you continue to edit in Premiere Pro.
Let’s take a look at the options that we have. First of all, at the top of the list we’ve got the option to Copy. And this just means that wherever your media is at the moment that you ingest it, a copy will be taken over to the storage location you specify. If you choose Transcode, then your media will be transcoded to whatever house codec you might be using. This is particularly useful, I suppose, if you’re working in a broadcast or where there is a house codec and it’s agreed that you’re going to stick to that standard.
If you choose to Create Proxies, then a low-resolution copy of your media is created that’s easier to play back for your system. The files are smaller so they take up less space in your storage. And that’s useful if you’re taking a copy of the media on the road. And also you’ll find that a lower powered system will have an easier time playing it back.
And down here, this is the option I’ve got selected at the moment, which is Copy and Create Proxies, which is going to transfer a copy of the media over to our local storage from wherever it comes and make proxies as well.
In fact, just to demonstrate this, I think I’m going to stick with Create Proxies, because we don’t need another copy of the media. Under the Preset menu, you can specify the new format and codec that’s going to be used for the proxies. You’ll notice that we’ve got the option to add and ingest preset.
You can create these with the Adobe Media Encoder and import them here to add them to the list. Just down from here we got the Primary Destination. Now this is grayed out because I’ve turned off the Copy option, this allows me to specify the location for the copies of the media I am ingesting. And then, below that we’ve got the location for our proxy media.
If you set the destination for your proxy media to be in your Creative Cloud Files folder then wherever you go, you’re going to have access to it. And of course if you put your project file in there as well, you can carry on working wherever you sit down and sign in with your Adobe ID.
I’m happy with these settings so I’m going to click OK. And having done that, I’m going to go back to my media browser. I’m going to just select all here. So I’ve got eight items selected and I’m going to pull them into my project. I’m just going to drag and drop them as I would do normally. When I do this, Premiere Pro is going to hand over the media to Adobe Media Encoder. And the Media Encoder is going to begin the process of creating those proxy files in the background.
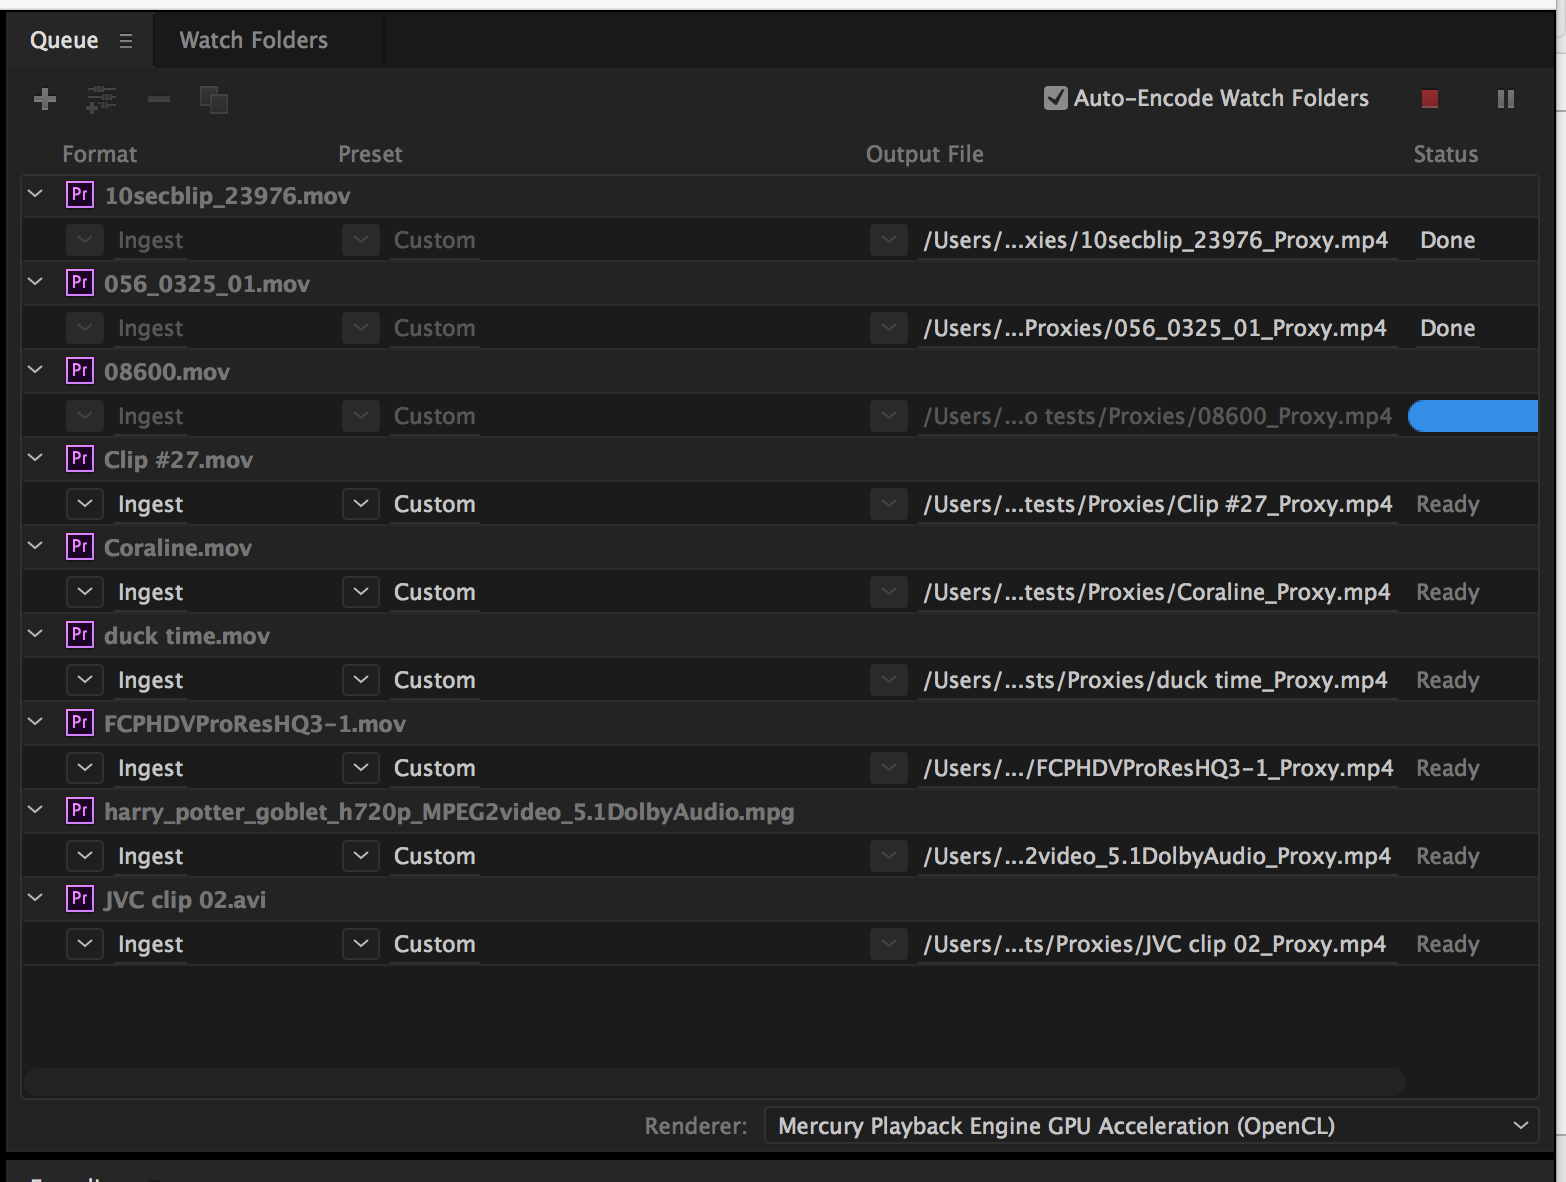
And here is the Media Encoder and you can see the process has already begun. I don’t need to do anything else, I can toggle straight back into Premiere Pro and I can carry on working.
So if I double click to open up one of these files, you can see I’m able to access it and carry on as I would normally. Once the proxy files are created, they’re automatically linked to your original footage.
So, of course, the next question is how do you switch to viewing the proxies instead of viewing the full resolution media? I’m going to let that proxy file creation process finish so I can show you what happens when the new media is available.
Okay, so my proxies have been created and I’m in Premiere Pro and ready to edit. Before I go any further, I’m going to just go full screen here, I am pressing the Grave key there to go full screen with my Project panel. And I’m going to add a proxy heading. I’m going to right click up at the top of the headings here and choose Metadata Display. And just to save time, I’ll do a quick search.
Here’s Proxy. I’m going to turn that option on and click OK. Let’s just scroll over a little so we can see the results. And there it is. Over on the far right, you can see that the proxy files are attached. So you can have a quick visual reference to let you know what’s going on with the proxy files.
And in fact, while we’re in the Project panel, if you right click, you’ll notice that you also have the option, right down here, to create new proxies for media that you’ve already ingested, to Attach Proxies that exist already. And if you are working with just the proxy files, perhaps because you’re on the road and working on a laptop, you can reconnect your full resolution media. That’s particularly useful if the media is in a different location for Ingest.
So I’m going to go back to a small Project panel and in my Source monitor, I’m going to go to the Button Editor and I’m going to add this button right here, Toggle Proxies. I’m going to click and drag this down to the bottom of my Source monitor and click OK. And switching between viewing the proxy versions of your media or seeing the original quality media is as simple as clicking this button.
And now with the Proxy Viewing mode enabled, I can play back this media with ease. Beautiful.
Just one important last thing I should note is when you export at the end of the process, maybe you’ve edited your sequence or even if you’re exporting a clip, the full resolution media is always used. So if you’re in this mode, viewing your proxies, don’t worry, you’re getting the full quality media used for that export process.
So that’s proxy creation and the ingest workflow in Adobe Premiere Pro.
Learn how to make low resolution versions of your high resolution files to work on lighter-weight devices in Adobe Premiere Pro.
Ingest and Proxy Workflow in Adobe Premiere Pro
某些 Creative Cloud 应用程序、服务和功能在中国不可用。
New Media Management features in both Premiere Pro and Adobe Media Encoder give you much greater control over the handling of your files during the ingest process, and allow more flexibility when working with large media files. You can set Premiere Pro to copy media to a specific location on your machine as it imports, and even begin editing immediately while your media copies in the background. If your workflow requires a transcode, you can easily set Premiere Pro or Adobe Media Encoder to handle that step for you too.
This release of Premiere Pro also brings support for more native formats than ever including 6K and 8K files from the RED Weapon camera. For times when the media you work with is more demanding on your computer system than it can manage. For example, when you want to work on a lightweight portable device, you can now generate proxies on ingest, automatically associating them with the native full-resolution media. A single click lets you toggle between full-res and proxy clips.
Ingest Settings & Media Browser
The Premiere Pro Media Browser panel allows you to ingest media automatically in the background while you begin editing.
An ingest check box in the Media Browser panel toggles on/off the automatic ingest behavior. A settings button next to it opens the Project Settings dialog box, where you can adjust the ingest settings. A similar ingest check box in the Project Settings dialog box is kept in sync with the Media Browser panel’s setting. When toggled on, you can choose one of four following operations to begin automatically when files are imported into the project. You can continue to edit while the ingest process completes in the background.
Copy
You can copy the media as it is to a new location. For example, this option is typically used to transfer camera footage from removable media onto your local hard drive. The transfer path is specified by the Primary Destination option available in Ingest Settings. After the media is copied, the clips in the project point to these copies of the files.
Transcode
You can transcode the media to a new format in a new location. For example, this option is typically used to transcode original camera footage to a specific format used within a post-production facility. The file path is specified by the Primary Destination option in Settings, and the format is specified by the chosen preset. After the media has been transcoded, the clips in the project point to these transcoded copies of the files.
Create Proxies
Use this option to create and attach proxies to the media. For example, this option is used to create lower-resolution clips for increased performance during editing, which can be switched back to the original full resolution files for final output. The file path where the proxies are generated is specified by the Proxy Destination option in the settings, and the format is specified by the chosen preset. After proxies have been generated, they are automatically attached to the clips in the project.
Copy and Create Proxies
This option copies media and creates proxies for them as well, as specified above.
Import preset support
All four options come with a set of default presets, which have the file destinations set to ‘Same as Project’. Alternatively, you can also choose a custom destination or your Creative Cloud Files folder, which syncs the files automatically to the cloud. You can also create your own ‘Ingest’ presets using Adobe Media Encoder.
The summary gives detailed information on destination path, preset used, and preset details.
Specific tips & workflow
Create an Ingest Preset
You can create and use custom preset for Ingest and Proxy workflow. Ingest and Proxy works only with Ingest presets created in Adobe Media Encoder.
How to create a new Ingest preset
1. Launch Adobe Media Encoder and create a new Adobe Media Encoder preset with the desired output settings, such as video codec and frame size. This step is optional and is used if you have a specific format and output settings that are not covered in the built-in Adobe Media Encoder presets. Audio settings in Adobe Media Encoder presets are ignored when transcoding or creating proxies via ingest.
2. In the Preset Browser in Adobe Media Encoder, click the plus sign (+) and select Create Ingest Preset, or select Preset > Create Ingest Preset. This step opens the Ingest Preset Settings dialog box.
3. Under Preset Name, name your preset. Under Comments, add any other information you desire.
4. To copy ingested footage to a new location on disk (or move a file from external media to the local hard disk), enable the Transfer option. Then, select a location for new files to be placed under the Destination drop-down menu. You can choose to verify the copied file by enabling Verify and selecting the verification type in the verify dropdown menu.
NOTE: If Copy is enabled in the ingest preset, the preset becomes available in Premiere Pro’s Ingest Settings dialog under the Copy and Copy and Create Proxies options, it is not available in the Transcode and Create Proxies options.
5. To transcode or create proxies when ingesting footage into a Premiere Pro project, enable the Transcode files to Destination option. Then, select a location for new files to be placed under the Destination drop-down menu. You can then select the output type under the Format drop-down menu. The list of available encoding presets appears under the Preset drop-down menu, including any custom encoder presets you have created.
NOTE: If Transcode files to Destination is enabled in the ingest preset, the preset becomes available in Premiere Pro’s Ingest Settings dialog box under the Transcode and Create Proxies options, it is not available in the Copy and Copy and Create Proxies options.
6. When you are finished with all sections of the Ingest Presets dialog box, press OK to save it in Adobe Media Encoder.
To use File Metadata and File Rename
You can add file metadata to files that are being transcoded or to new proxies, and you can rename files on ingest when copying or transcoding (the filename of proxies is always inherited from the source file). Rename does not work with camera format files (for example, P2 folder structures).
Adding File Metadata
1. When creating an ingest preset, enable the Add File Metadata by clicking the check box. In the drop-down menu on the right, select New Preset.
2. Click the + sign, and Metadata key and value pairs. You can add more key and value pairs by clicking the plus sign (+).
3. When you are finished entering the pairs, press Save button to save the metadata preset. A dialog box appears asking for a preset name. Enter the name and save.
The Add File Rename action
1. When creating an ingest preset, enable “Add File Rename” by clicking the check box. In the drop-down menu on the right, select New Preset.
2. Click the + sign, and select the type of rename action you would like to add. You can add additional rename actions by clicking the plus (+) sign.
3. After adding rename actions, press save button to save the Raname preset. A dialog box appears asking for a preset name, enter the name and save.
NOTE: File Metadata and File Rename are stored as presets on disk. When moving an ingest preset to a new computer, the metadata and rename presets must be moved also. If the File Metadata and File Rename presets are not moved to the new computer, the ingest preset does not function correctly. To do this:
a. Select the desired metadata or rename preset from the dropdown, then select the second dropdown to the right of the selection dropdown.
b. Choose the Save As command and save the File Metadata or File Rename preset to a new location on disk.
c. On the new, secondary computer, open the Ingest Preset Setting dialog, and select the File Metadata or File Rename drop-down menu and select Import Preset.
Create Proxies
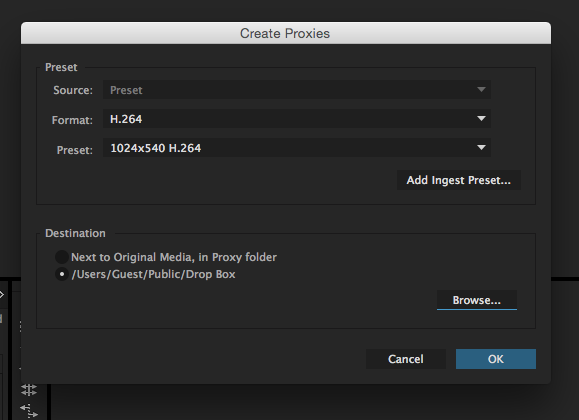
You can create proxies directly from items in the project panel. Choose Create Proxis from the project panel context menu to open the Create Proxies dialog. The menu item is enabled when one or more items in the panel are selected that can be proxied. Premiere Pro can create proxies for master clip project items if they have video, have no captions, and are not growing files. The media must also be online.
In the Create Proxies dialog you can choose one of several built-in presets to use when transcoding high-resolution originals to create proxies. You can also add presets created in Adobe Media Encoder by clicking the Add Ingest Preset button. You can also choose to create proxies in a «Proxies» directory next to the original media, or in a custom location.
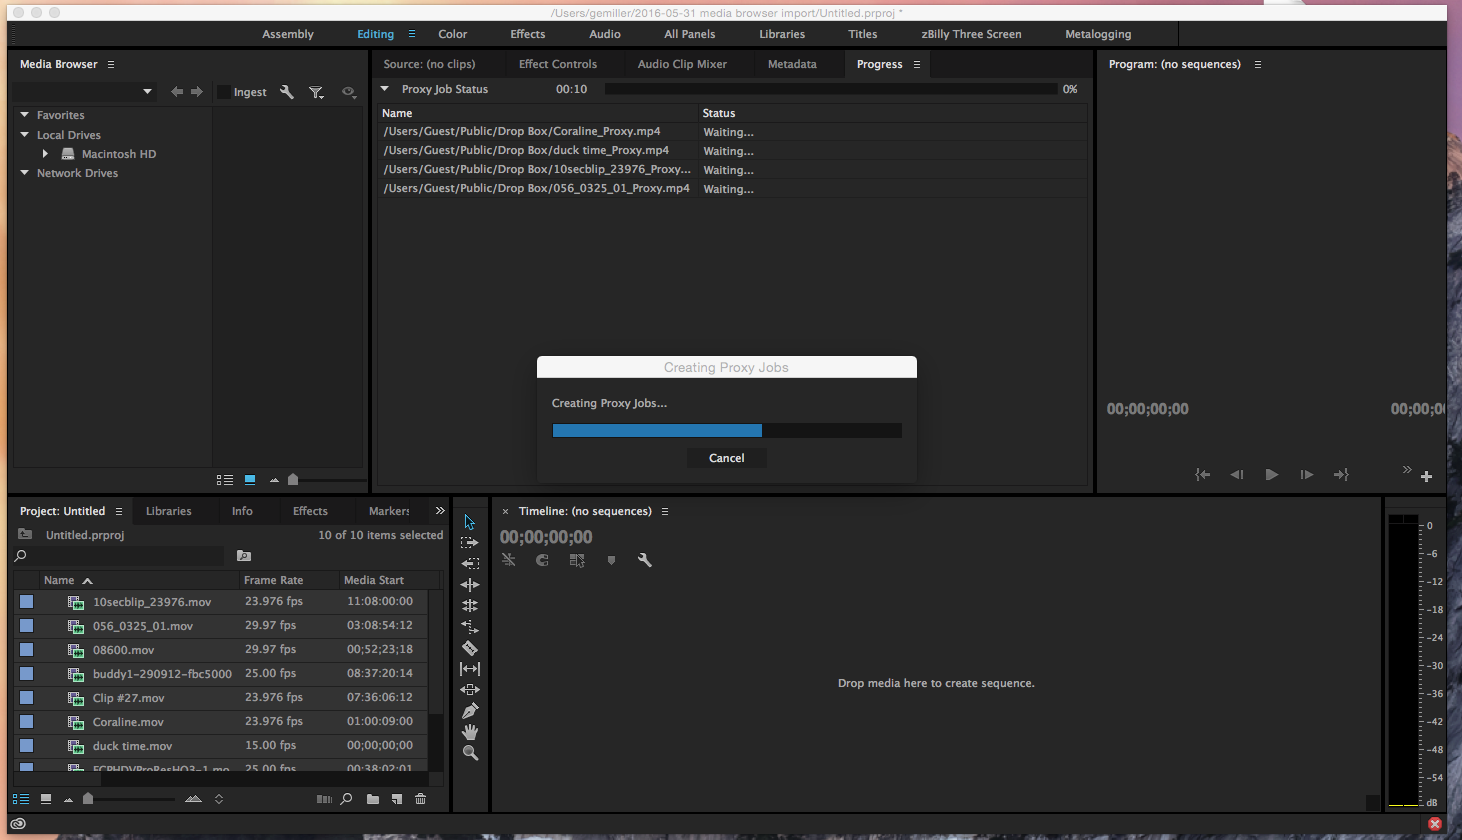
When you click OK in the Create Proxies dialog box, Premiere Pro presents a progress dialog box while it prepares proxy creation jobs to send to Adobe Media Encoder. If you press Cancel, the process is aborted and no changes are made to the project.
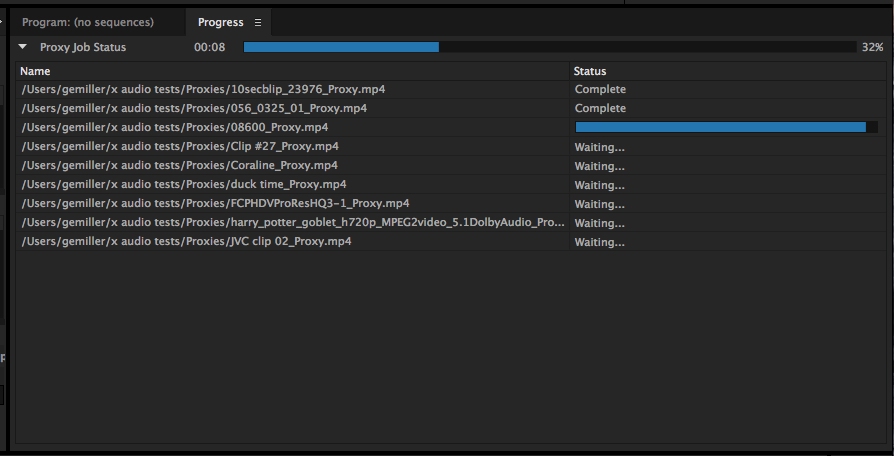
If you allow the progress dialog box to complete, a proxy job is created in Adobe Media Encoder for each of the project items chosen that can be proxied, and an offline proxy is attached to each project item. You can monitor the progress of these jobs in the Premiere Pro Progress panel, or in Adobe Media Encoder.
While the jobs are processed, you can continue to work with the corresponding high-resolution project items in Premiere Pro. When the proxy jobs complete, Premiere Pro automatically switches to displaying the proxy video in the Timeline if Enable Proxies is enabled in the Media preferences panel.
Premiere Pro does not need to remain open while proxy jobs are processed in Adobe Media Encoder. If you quit Premiere Pro before all jobs are complete, any proxies created while Premiere Pro is not running are attached when Premiere Pro is launched and the document is reopened.
Progress panel & dialog
Ingest and Create Proxies
When transcoding or creating proxies, the rendering in Adobe Media Encoder are displayed in the progress panel. To see the dialog, choose Window > Progress…” You see separate entries for Proxy job status and for Ingest job status. Status can be Waiting. Complete, In Progress (or a progress bar), Canceled, and an error message if the job failed.
When creating proxies from existing files in the Project Panel, you can cancel the entire operation while the “Creating Proxy Jobs” dialog is open.
NOTE: When transcoding or creating proxies in Adobe Media Encoder, you can pause and restart the render queue, without canceling the connection to Premiere Pro, allowing automatic attachment of proxies to continue to occur between Premiere Pro and Adobe Media Encoder. If you stop the render queue in Adobe Media Encoder, any connection between proxies and original files are lost, and no automatic proxy attachment takes place. If the queue in Adobe Media Encoder is stopped, you must recreate all transcode or proxy jobs.
Attach Proxies, Reconnect Full Resolution Media & Toggle/Enable Proxies
These two options are used for manual attachment of Proxy or Full Res media. These options are useful if you create proxy media outside of the Create Proxies workflow (for example, media created via third party software, hardware, or a combination of both) or you want to reattach Proxy or Full Res media to Offline clips. The supported workflow allows attachment of Proxies with other frame sizes & PAR (pixel aspect ratio) combinations that are divisible by the Full Res clip (for example, 1920×1080 1.0 PAR Full Res and 960×540 1.0 PAR Proxy or 1440×1080 1.33 PAR Proxy), but other parameters such as fielding, frame rate, duration, and audio channels must match. Mismatched audio channels results in warning dialogs and are not allowed, but other mismatched video parameters are not blocked and results in issues.
Media support: Attach Proxies and Full Resolution Media options are available for video-only, A/V, and Offline clips in the Project panel. Other file types (for example, audio-only, stills, image sequences) are not supported. Right-click (WIN) or Ctrl-click (Mac OS) your clips in the Project panel and choose Proxy > Attach Proxies or Reconnect Full Resolution Media. You can also assign shortcuts for each option in the Keyboard Shortcuts dialog box.
Note: Attach Proxies and Reconnect Full Res Media options is always be enabled for supported clips. If you decide you want to change the Full Res or Proxy of a clip, you can choose either option again and attach a different clip.
Enable/Toggle Proxies: To view Proxy or Full Res, simply use the Toggle Proxies button in the Source Monitor or Program Monitor. This button is available in the Button Editor (the plus sign (+) in the lower right of either Monitor), that you can add in the transport controls area. This setting is a global machine Preference, so it can also be set via Preferences > Media > Enable proxies. These buttons and Preference are linked, so setting it one place sets it in the others. The Toggle/Enable Proxies preference applies to all Projects created on that system. If you move the Project to another system, the preference is determined by what was set on that system, not the Project. When set, the button turns blue which indicates that you are viewing Proxy in the Source and Program Monitors. You can also set a shortcut for Toggle Proxies in Keyboard Shortcuts.
Note: Other panels do not automatically update thumbnails based upon the Toggle/Enable Proxies state. This can result in thumbnails not following the Toggle/Enable Proxies setting, but that does alleviate certain performance issues.
Proxy column: In the Project and Metadata Panels, there is an option in Metadata Display > Premiere Pro Project Metadata for Proxy column. Click the check box and a Proxy column is added to the panel in List View. The column is blank if no Proxy is attached, it lists as Attached if a Proxy is attached to a clip, and it lists as Offline for an attached Proxy that is missing or Offline.
Note: The Metadata panel and Project panel columns only reports information for the Full Res clip. There are two places where you can view information of the Proxy clip: Properties and Info Panel.
Properties: When you get Properties on a clip with Proxy attached, the top portion contains information for the Full Res clip and below that lists information for the Proxy clip.
Info Panel: When Proxy is attached to an A/V clip, the Info panel lists the basic video and audio information below the Full Res clip info. The info panel does not report Proxy information for video only clips, though.
Note: All other areas of Premiere Pro only reports Full Res information.
Offline and relink/reattach: The Link Media dialog has not been updated to restrict functionality for Proxy. In the Link Media dialog, make sure to only relink to same files and avoid unsupported formats, and so on (the Attach dialog box restricts your choices to only supported formats). Depending on if Full Res or Proxy are Offline, you have slightly different options to relink or reattach.
Note: If Proxies and Full Res are both Offline, when you are presented with the automatic Link Media dialog in process of opening a Project and you want to only relink certain clips, you can Shift or Command/Control click the desired clips in the Link Media dialog.
Known items & tips
• To easily monitor the Offline/Online status of clips, set the Project panel to List View and enable the Proxy column, moving it next to the existing Status column (reports status of Full Res). See screenshot below for an example.
• When you render Previews, Export Media or use certain Analysis effects (Warp Stabilizer, Rolling Shutter Repair, Morph Cut), Premiere Pro always uses and displays Full Res, regardless of the Toggle/Enable Proxies setting. The only exception is when you have Offline Full Res, but Proxy is Online, then Proxy is used.
• Note that certain combinations of resolutions and codecs may be of good enough quality to make it difficult to discern any visual differences between Proxy and Full Res clips. One tip is to create a custom preset with a watermark or some other visual indication. When you create your Adobe Media Encoder preset, choose the Effects tab and select from options such as Lumetri Look/LUT, Image Overlay or Name Overlay. This has an added benefit of helping protect your media.
• If you encounter any issues with Toggle/Enable Proxies not working or tool tips do not work, quit Premiere Pro and delete Preferences. You can also delete Preferences by pressing Shift + Option/Alt keys while launching Premiere Pro.
• The recommended Proxy workflow includes appending «_Proxy» to the name of your Proxy clips (for example, scene01_Proxy.mxf) and placing Proxy clips (on disk) in a folder named «Proxies» that is placed right next to the Full Res clips. This helps with reattachment of clips. The Create Proxies dialog’s default destination setting takes care of both of these conditions. If you happen to set a custom destination, then you should add the Proxies folder to the destination. By default, any Create Proxies action automatically appends «_Proxies» to the clip name.
• Full Res or Proxy clips with the same name (for example, C0001.mxf, C0001.mxf, C0001.mxf) or multiple versions of same name with appended number (for example, MyClip_Proxy.mxf, MyClip_1_Proxy.mxf, MyClip_2_Proxy.mxf) can cause some confusion with the Attach and Link Media dialogs when they are set to Relink others automatically. This can result in automatic attach or relink to the wrong clips. To avoid issues, you can deselect this option and attach or relink the affected clips one by one.
• The Proxy workflow is not supported for interchange options such as Project Manager, Render and Replace, AAF, Final Cut Pro XML, EDL, OMF, and so on. You lose Proxy attachment for these functions. After Effects and Audition interoperability functions are also not currently supported with the Proxy workflow.
• Modify > Audio Channels and Interpret Footage are also not supported for Proxy Workflows.
• Formats with Master Clip Effects Source Settings (for example, R3D, ARRI, DPX, and so on) are supported for Full Res clips. Master Clip Effects Source Settings formats are not supported to be used as Proxy clips, however. for example: R3D Full Res and H.264 Proxy is supported. R3D Full Res and DPX Proxy is not supported.


